This video article is part 3 of a three-part series on the Concept2 rower, with the goal of helping you be faster, more efficient, and safer in your endeavors with the mighty rowing machine. I encourage you to head over and check out Part 1: How to Properly Set Yourself up on the Concept2 and Part 2: Rowing Tutorial: The Four Phases of Rowing. Watching/reading both of those are not necessary to understand the common errors below, but incredibly helpful in seeing the larger picture.
In previous posts we’ve introduced the erg rower as a simple tool, but a tool with technical parameters nonetheless. If all these technical points aren’t mastered, or an individual lets a few go to the wayside, rowing instantly becomes less effective. For consistency and comprehension of the vocabulary used, we recommend that you look at our previous article on the four phases of the row stroke. If you’re a novice rower, you might clean up all your technical issues by simply watching/reading that post.
For those of you with some rowing prowess (or those who have at least read the row positions blog), today we’re going to cover three common errors that we see regularly with more inexperienced rowers. After we introduce the inefficiencies and address their corrections, we hope you’ll walk away with tips than can make rowing not only easier, but ultimately improving your ability to produce MORE power with LESS effort.
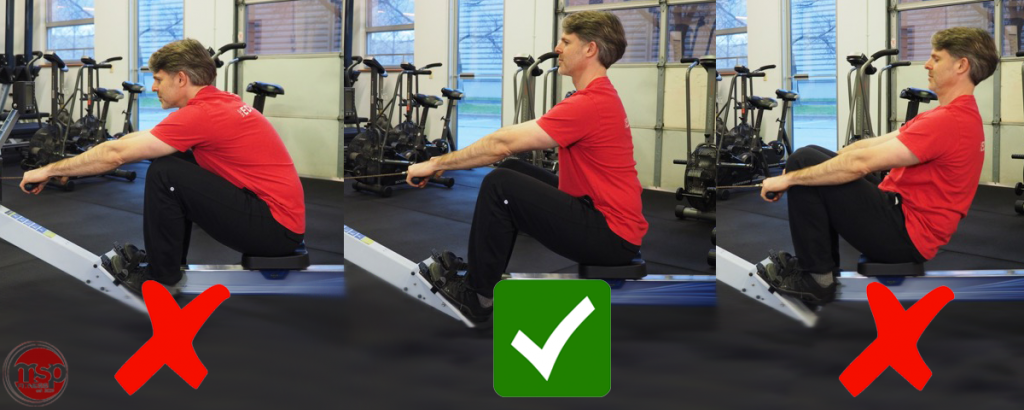
1. Improper Catch Position (i.e. Bad Setup)
We’re going to start where the row stroke itself starts, at the catch position. Instead of commencing with what can go wrong, let me simply reiterate what we want to see. In the catch position we want vertical shins, tall torso with shoulders slightly ahead of the hips and spine neutral, and straight arms with a wide enough grip to match shoulder width. This is the start position, anything that deviates from this is just not efficient, and possibly unsafe.
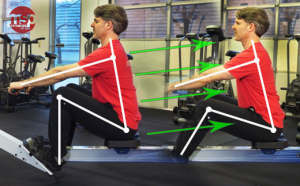
2. ‘Shoot The Hips’ or Over-pull with the Upper Body in the Drive Phase
The second place that we see mistakes is when people either shoot the hips out of the gate OR fail to use the legs properly off the catch, opening the hips first. Neither of these are ideal, however both are correctable with the same simple exercise. We’ve dubbed this accessory drill the “burp” or “hiccup” drill.
To perform, find the correct start position and give a solid punch with the feet into the footbeds. As your performing these mini drive stroke starts, it is imperative that you stay in a good position throughout the body. Body angle from the shoulder to the hip shouldn’t move at all, as the legs begin to straighten, grooving into your mind the feeling of rowing with the legs first. This drill is also important because it grooves our power output at the feet to immediately translate into the hands, catching the flywheel and thus racking up meters on the monitor the moment you start the drive.
“Burp / Hiccup” Drill
Over pulling with the upper body or shooting the hips is wasted movement that detracts from your overall rowing performance. We recommend performing the “burp/hiccup” drill in sets of ten as part of your larger warm up. This will help your sequencing improve and you’ll be rowing without loosing precious energy in no time!
3. Failure to Sequence the Recovery Phase.
Most folks who find themselves rowing have a good idea of what the finish position on a rower looks like. At MSP Fitness, we’ll make a few corrections here and there, but by and large everyone is on board with legs straight, torso and hips swung open with the body leaning back at 1 o’clock, and hands into the chest with forearms parallel to the floor. The biggest thing that goes wrong here is individuals improperly sequencing back to their catch, otherwise knowns as botching their recovery phase.
If there is a lowest hanging fruit common error, this IS IT! This is clearly the most common, common error we see. Fixing this problem cleans up so many others it deserves your attention.
From the finish position, the greatest mistake one can make is this mindless cascade of everything back to the catch position. When the recovery stroke isn’t sequenced properly, the next drive stroke is affected. If the sequencing is wrong on every stroke, the entire duration of that rowing session is wrought with imperfections and inefficiencies.
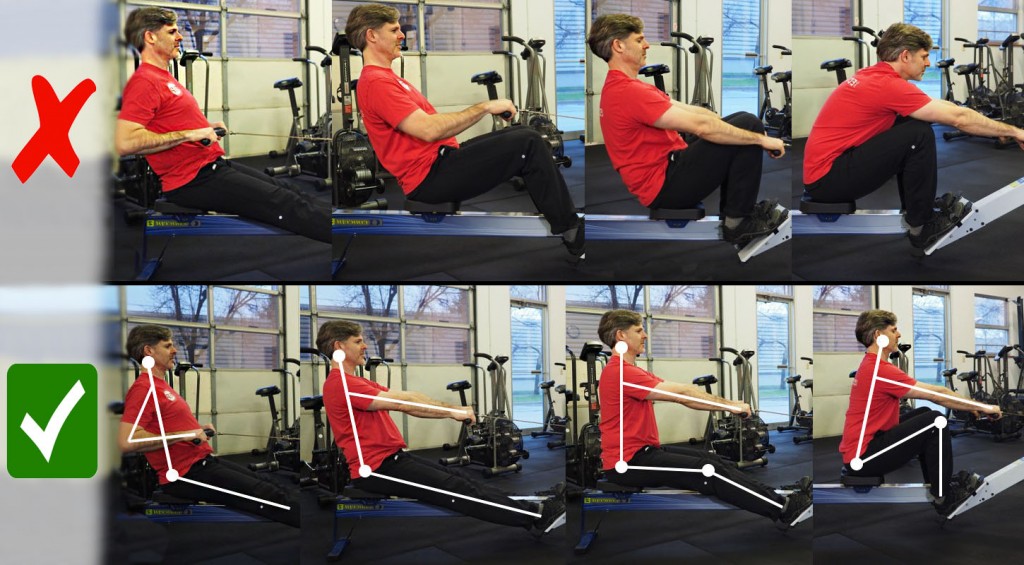
Fixing this is made easy by following the proper order of events. Like we stated in our previous blog posts, the sequence of the recovery is simply the reverse of the drive stroke. If it was legs, body, arms for the drive…it’s arms, bodies over, and legs for the recovery. So step one is ou lead with the hands, straightening the arms without torso or leg movement. Then you lean the body forward, pivoting at the hips, finding that body over position. Lastly bending the legs at the knees, keeping the straightness of the arms and the forward angle of the torso until you reach the vertical shin found in the catch position.
One drill that we’ve found to be rather helpful in teaching this principle is focusing on an aspect of the “Pick Drill”. To perform, finish a row stroke as you usually would. Next, commence the recovery sequence, pausing at bodies over with straight arms, straight legs, and a forward torso lean. You can wait at this paused position for as little or as much time as you so desire. You’d then start the next stroke from this position, bending the legs to return to the catch, driving and then pausing at arms away, bodies over…and so on…and so on with the intention to force/encourage you to remember the proper order of the recovery.
I hope we’ve helped your rowing by showcasing some of the most common row errors we see in the gym. By implementing a few of the above corrections and drills, your rowing ought to clean up pretty quickly and in doing so, give you better performance in your training. Keep in mind that any technique shifts are meant for applying in a low(er) intensity environment. What I’m saying is don’t try and make all the above changes on your next 500m row sprint. So take some time during your next warm up to practice these things.
In the meantime, take a look at a few of our other articles on rowing to shore up your start position and learn a thing or two about all four phases of the row stroke. If you’re in the Minneapolis / St. Paul area and are looking for a personal coach, group fitness program, or a fun and active training environment, get in touch with us today!
-Written by Michael S. Pilhofer